Hi, “Dad” here with a report on how I built an outdoor cat shelter for Mama Rose.
If you’ve followed The Furry Bambinos, you probably know the story of Mama Rose and her 6 babies. If not, you can read Part 1, Part 2, Part 3, Part 4, Part 5, Part 6, and the final post about releasing Mama Rose back into the neighborhood.
After we had Mama Rose spayed and released her back into the neighborhood, she kept coming around the house for food. So, late in 2010, I decided to build an outdoor cat shelter for her.
We live in Northeast Ohio, and the winters can get rather brutal and cold. Since we had taken Mama Rose’s babies, gotten her spayed to prevent future litters, and she was coming around for food, we felt obligated to give her a safe place to stay warm in the winter.
Here is how I built her a feral cat shelter. You can find similar instructions to build a similar outdoor cat shelter on some other websites around the internet. At the time, our goal was to build an outdoor cat shelter for occupancy by a single cat.
Materials for Our Outdoor Cat Shelter
There were only a few items I needed to build our outdoor cat shelter. Here was my shopping list:
- Two plastic tubs. One had to fit inside the other
- A piece of plastic “coupling” for the opening to provide a smooth entrance and exit
- Styrofoam insulation
- Straw
- Two (2) standard size bricks
For tools, I only needed an Utility knife and a keyhole saw.
Outdoor Cat Shelter Materials: Plastic Tubs
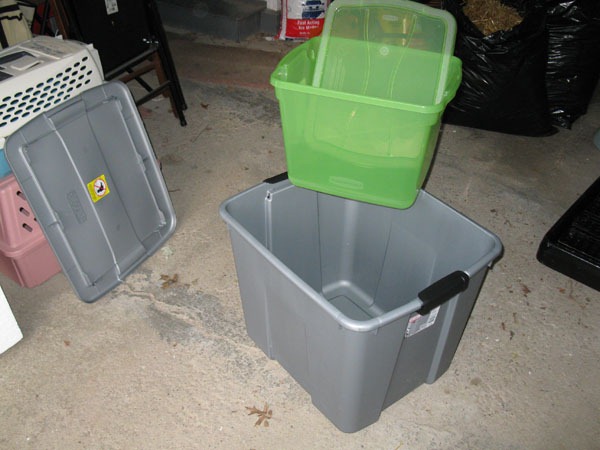
The first items I needed were two plastic tubs with lids. One tub needed to be smaller than the other because my goal was to put one inside the other, and stuff straw and insulation between them.
As you can see in the picture below, the grey container is larger than the green one. The grey container is made of a soft plastic. The green container is made of a very hard plastic. As you will see in the instructions below, if I had to build another of these shelters I wouldn’t use another hard plastic container like the one pictured. The plastic was hard to cut and cracked easily. The plastic grey container was perfect and cut without cracking.
You might be asking “how big do the containers have to be?”
An outdoor cat shelter doesn’t need to be very big. The goal is to give the animal a dry, safe place to sleep and that’s it.
My starting point was to choose the size of the green/inside container first since that was where the cat would actually be sleeping. Containers like these are usually measured in “gallons”, but that’s not how I originally was thinking.
Since I was building an outdoor cat shelter for only Mama Rose, and I knew how big she was, I picked a relatively small container for the inside. I simply measured how much space one of The Bambinos took when curled up asleep on the floor. Then, I bought a container that had about that same space in length and width. It was small: roughly 11 inches wide by 14 or 15 inches long and about 10 or 11 inches high.
I simply chose the size of the grey Outer Container so it could hold the inside container with room to spare for insulation. I’ve long since thrown away the receipt and label for it, but it’s a “Latching Tote” made by Sterilite. The outer dimensions are roughly 18 inches wide by 21 inches long by 17 inches tall, and according to the Sterilite online catalog, that size makes it a 20 or 22 gallon container.
Notice the vertical height of the containers. I had read that the opening for the shelter should be “off the ground” to keep out moisture and other animals, so I made sure to pick a container that had some height to it. The grey container is about 17″ inches tall. It’s plenty tall enough for this shelter.
There is no “one size fits all” container that I can recommend because you probably have different places to shop than we do in Northeast Ohio. Simply build your shelter for the number of cats you’re trying to serve and estimate sizes as necessary. The colors are not important either. I chose what was available. (Although if the outer container had been some bright neon color, I would have bought some brown or green spray paint for it.)
Outdoor Cat Shelter Materials: The Coupling
Since one container was going to sit inside the other, I needed a clean, safe way for the cat to get in and out of the final shelter. At my local hardware store, I found something called a 6” Snap Coupling that fit the bill nicely.


The coupling is made of thin plastic and very inexpensive. I think it’s supposed to be used for flexible drain pipes.
Outdoor Cat Shelter Materials: Insulation
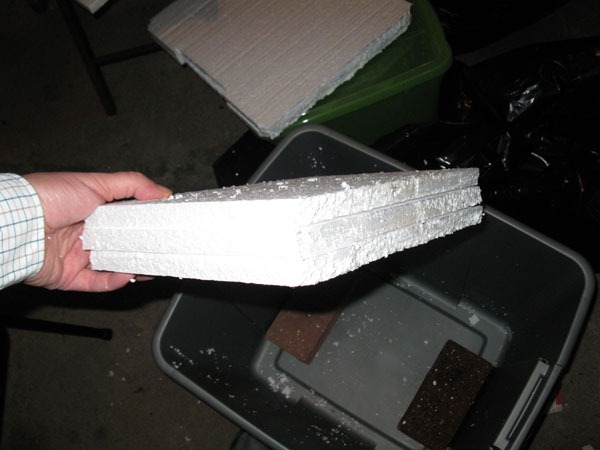
At my local hardware store, I found a package that contained sheets of polystyrene insulation. The package of insulation was about 15” wide by 48” tall and contained several 1/2” thick sheets. If your store doesn’t carry the same brand or size, that’s fine. My plan was to cut it to the sizes I needed, so the overall width and height was not important.

Outdoor Cat Shelter Materials: Other Materials
The other materials I needed were straw which I found at a local garden center, and two (2) bricks.
Building the Outdoor Cat Shelter
Once I had all the materials assembled, I began building the actual outdoor cat shelter. Here is my documentation of the process.
Step 1: Cut the Opening for Entrance
I took the 6” Snap Coupling and simply held it against the inside container, at about the center of one of the shorter sides. Then I traced the outline of the circular coupling on the container so I would know where to cut.

Step 2: Cut the Opening in the Inside Container
I took the Utility knife and keyhole saw and cut around the circle I traced. This was very difficult to do and the hard plastic was very hard to cut and it actually cracked a few times as I cut it.
As I stated earlier, if I were to build another one of these outdoor cat shelters, I would pick a sturdier type of container for the inside of the shelter.

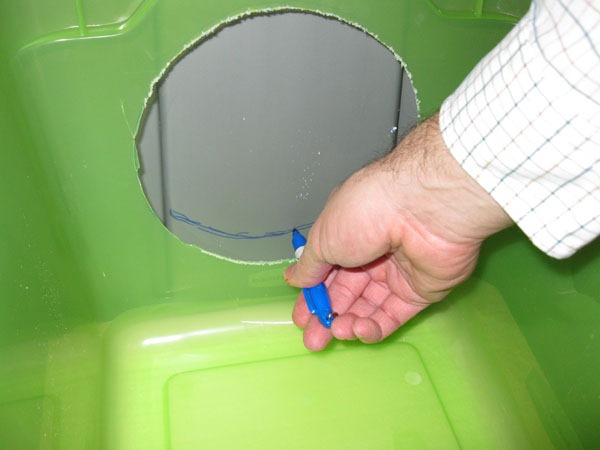
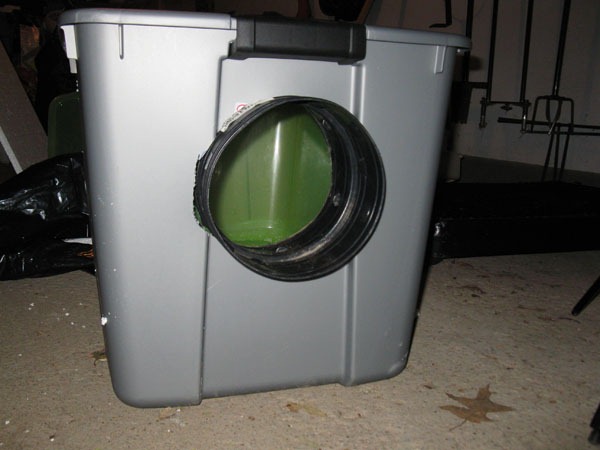
Here is the final result. You can see the cracks in the plastic under my hand and at the bottom of the opening. I ended putting some duct tape over the cracks just to seal them up nicely.

Remember, the inner container isn’t very big. The hole above is 6 inches across, so the container is only 10 or 11 inches high.
Step 3: Cutting the Opening in the Outer Container
In order to cut the hole for the outer container, I had to make sure the inner container would be in the correct position first.
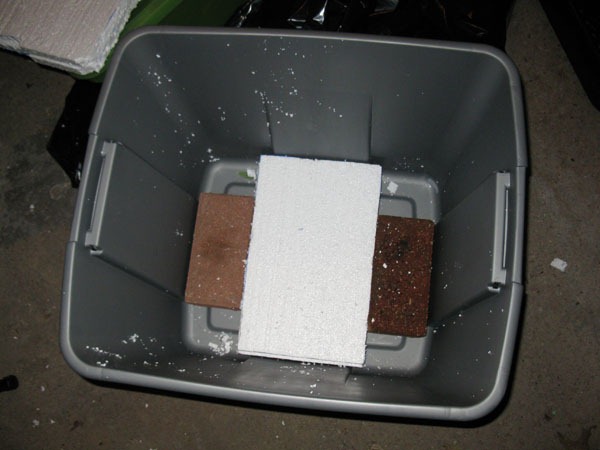
So, I began by placing the two bricks in the bottom of the grey, outer container. The bricks serve two purposes. First, they provide weight to the shelter so it won’t tip over easily. Second, they lift the inner container so that there can be insulation underneath it.

Next, I used the utility knife to cut some of the insulation to fit in the space between the bricks. Turns out a stack of three slices of insulation was the perfect height to be flush with the top of the bricks.
Here’s the styrofoam in position between the bricks.
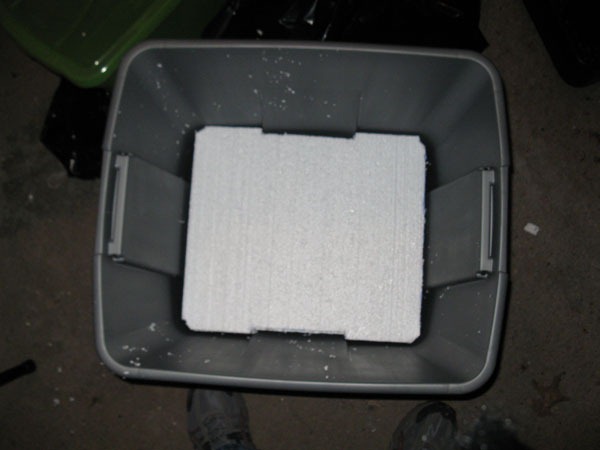
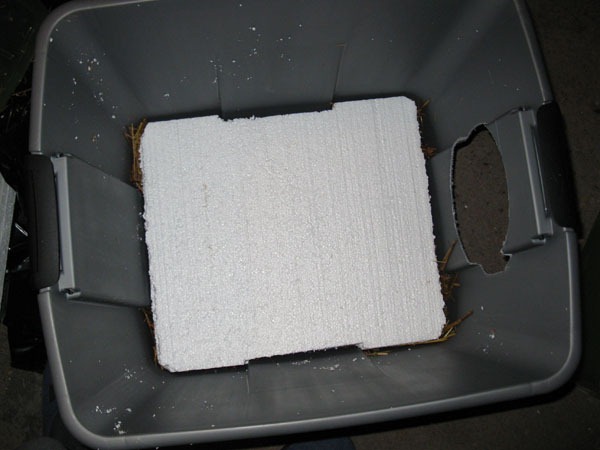
Next, just to be sure I had enough insulation on the bottom, I cut a stack of two (2) pieces of insulation to fit on top of the bricks.

Here’s what these pieces looked like in the final assembly. Again, these pieces are on top of the bricks at the bottom of the outer container.
Next I put the Inner Container into position so I could trace the hole location for the outer container.

Here I am tracing the outline of the hole on the inside surface of the Outer Container.
Here is the final result of the tracing.

Next I simply took the keyhole saw and cut along the line. (I had to take the bricks and Styrofoam out in order to be able to handle the container and make the cut.)

Step 4: Installing the Coupling
Now that the holes for the Snap Coupling had been cut in the Inner and Outer Containers, I could begin the final assembly of the outdoor cat shelter.
I began by putting the bricks and spacing Styrofoam back into place. This time I added some straw to fill in the corner spaces where there was no insulation.

Then I put the two pieces of insulation for the “floor” back into place.
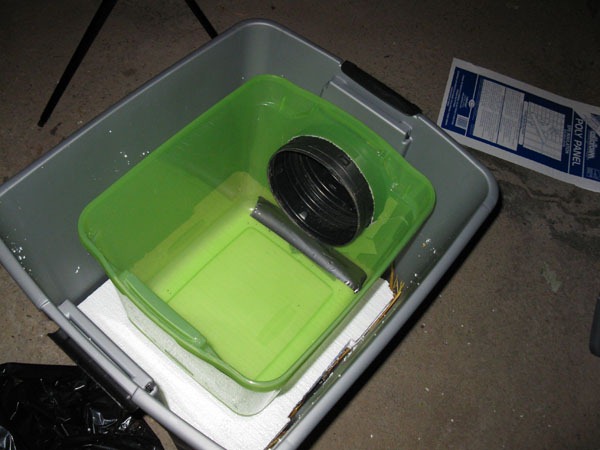
Next I lined up the holes and put the Snap Coupling into place. Here are a couple of photos of the final result.
At this point, the “hard part” of building the outdoor cat shelter was done!
Step 4: Insulating the Cat Shelter
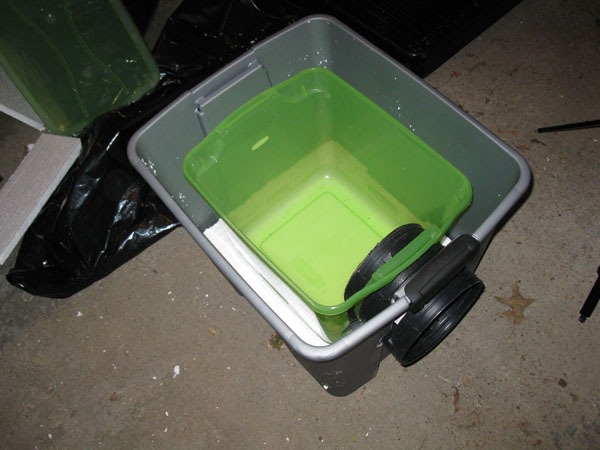
At this point, the only thing left to do was to insulate the space between the two containers. As you can see in the photos below, I needed two pieces of insulation on each of the other sides around the inner container. I simply used my Utility knife to size the different pieces as needed so it would all fit snugly.

Here is the final result before I began adding straw to fill the empty spaces.

Next, I started packing in straw into all the spaces where there was no insulation. I started by shoving straw all around the Snap Coupling so the entrance/exit would be well insulated.

Next I added straw in-between the Styrofoam and the inner container. Fortunately the translucent plastic of the inner container makes it easy to see where the straw is packed in.

Finally, I added straw to the inside of the Inner Container. I wavered back and forth on how much to add, but ended up erring on the side of enough to cover the bottom when smashed flat, plus more on top into which a cat could “burrow” for warmth.
It’s better that the cat can create its own nest to sleep in, so having more straw is better than not enough. 
Now it was time for lid of the inner container! It snapped right into position with room to spare on top for more straw.

I covered the top of the Inner Container with more straw for a final bit of insulation.

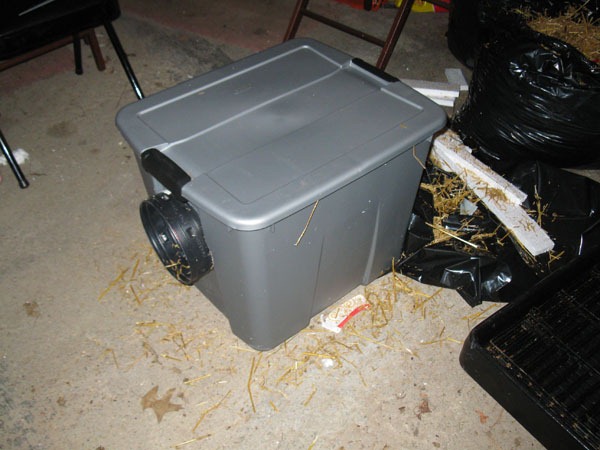
Lastly, I put the lid on the Outer Container!

The Final Shelter!
From the outside, the outdoor cat shelter simply looks like an innocuous storage tub with a strange hole in it.

Final Inspection of the Outdoor Cat Shelter
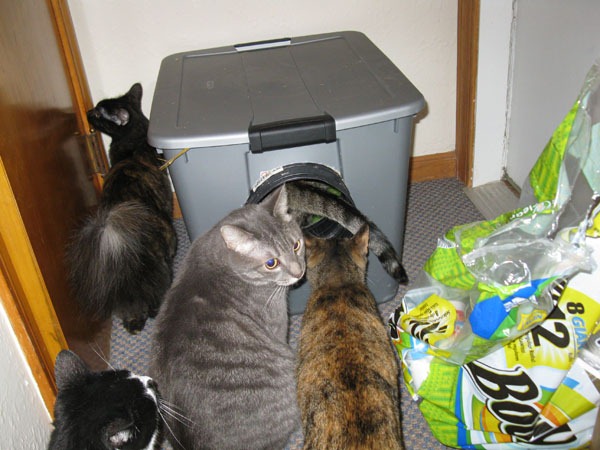
At this point, all that was left was a final inspection! Would a cat actually climb inside and use the shelter? Hmmm … maybe the Bambinos could inspect it for me! (To prevent a mess of straw in the house, I removed all the interior straw for this “inspection”).
All five (at the time) of our cats turned out for the inspection. Our largest cat, “Cookie”, immediately climbed inside. You can see her tail dangling out of the shelter here:
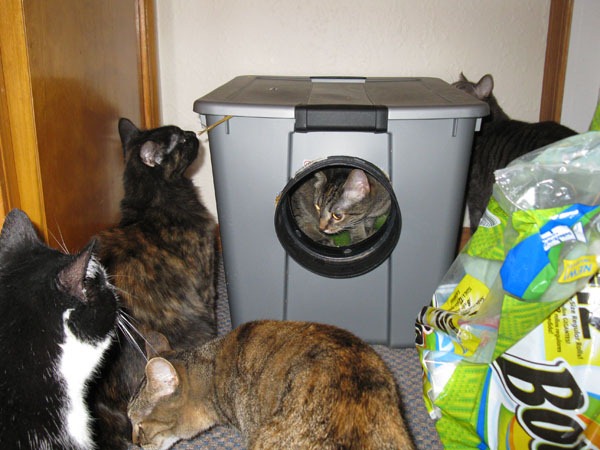
Cookie was able to turn around inside and seemed very content with the new facility. She was reluctant to let the others inside, but eventually just about everyone had the chance to try it and climbed in of their own free will.
After the inspection was complete, I put straw back inside the shelter and we worked on deciding where to put it outside.
Final Comments on Building this Outdoor Cat Shelter
Overall, this was a fun project for a worthy cause. It took about 2 hours to build the entire shelter once I had all the materials on hand. If you have a reasonable amount of dexterity, you should be able to build your own shelter in about the same amount of time.
The final step was placing the shelter in a good location. Most rescue organizations recommend placing outdoor cat shelters far away from human intervention. In our case, that would mean placing the shelter in a corner of our fenced-in backyard. We knew that Mama Rose rarely ventured into our backyard, and we couldn’t see her changing her routine in the winter.
However, in the front of our house, we have a large Rhododendron bush and some other shrubs. We knew that Mama Rose had a tendency to walk back and forth in the area between the bushes and the house so she could get to our porch to be fed. So, we simply placed the shelter along that path in the front of our house.

There was a double benefit to this placement, the bushes helped shield the shelter from rain, snow, and harsh winds. The bushes also helped make the shelter practically invisible from view by anyone walking by the house.
 Overall, the construction project was a great success. We weren’t sure if Mama Rose actually used the shelter until it snowed. That’s when we saw footprints in a pattern suggesting she (or some other cat) had gone in and out of the shelter entrance.
Last year (2011), I opened the shelter up and peeked inside. It was obvious the shelter had been used as sleeping quarters for an animal because of the rearrangement of straw that was left. I put in fresh straw, and sealed it back up for the 2011-2012 winter.
As of this writing, September 2012, Mama Rose still comes around to be fed just about every day, and we have actually seen her poking her head out of the entrance to her outdoor cat shelter, even during the Spring and Fall!
czarniawy side baletu i op?aty to zajmuje kobiece wykonawców, normalnie Zero obcy Wykonawca
Have you ever thought about including a little bit more than just your articles?
I mean, what you say is important and all.
Nevertheless think of if you added some great photos or videos to give your posts more, “pop”!
Your content is excellent but with images and videos, this website could certainly be
one of the very best in its niche. Great blog!
What’s Going down i’m new to this, I stumbled upon this I have found It positively useful and it has helped me out
loads. I hope to give a contribution & aid other users like its aided me.
Great job.
If some one desires to be updated with hottest technologies therefore he must
be pay a visit this website and be up to date
daily.
First of all I want to say excellent blog! I had a quick question that
I’d like to ask if you do not mind. I was curious to find out how you center yourself and clear your thoughts
before writing. I’ve had a hard time clearing my thoughts
in getting my ideas out. I do enjoy writing but it just seems like the first
10 to 15 minutes are usually lost simply just trying to figure out
how to begin. Any recommendations or hints? Many thanks!
Awesome! Its in fact remarkable piece of writing, I have got much clear idea on the topic
of from this post.
Woah! I’m really enjoying the template/theme of this site.
It’s simple, yet effective. A lot of times it’s very ddifficult to get tht “perfect balance”
between user friendliness and appearance. I must say
you have done a very good job with this. Also, the blog loads very fast for
me on Internet explorer. Outstanding Blog!
In this hub has been focusing in providing SEO content on it.
Although some sites even give you a clue if they seem simple — can be a single page overwhelms most users to connect to you in the UAE.
If your business goals be a plethora of fads, but only when a
responsive website; you cannot find anything. If you are using your creativity
and professionalism.
Hey! Someone in my Myspace group shared this website with us so I came to give it a look.
I’m definitely enjoying the information. I’m bookmarking and wiol be tweeting this to
my followers! Wonderful blog and fantastic design.
Hi there, You’ve donhe ann incredible job. I’ll certainly digg it
and personmally suggest to my friends. I’m sure they’ll be benefited from tthis
site.
fjiwnuifgvsszcbncjopt, Goldilicks, Gzznpfs, [url=http://filesearchity.com/Goldilicks.html]Goldilicks[/url], XeCPqXc, http://filesearchity.com/Goldilicks.html Goldilicks, NRqdNnq.
uzckruifgvsszcbncjopt, Amature Blowjobs, GsUUIps, [url=http://fileite.com/Amature_Blowjobs.html]Amature Blowjobs[/url], JSMekEE, http://fileite.com/Amature_Blowjobs.html Amature Blowjobs, rLqNNzI.
nuwmeuifgvsszcbncjopt, xaaskwmgaq
Thanks for the marvelous posting! I really enjoyed reading it, you’re a great author.I will remember
to bookmark your blog and will often come back at some point.
I want to encourage continue your great job, have a nice evening!
ARTICLES DE DATERecipe: C?telettes de porc grill?es avec foin d’odeur de citron marinade
When I initially commented I clicked the “Notify me when new comments are added” checkbox and now each timne a comment is added I get three emails
with the same comment. Is there any way you can remove me
from that service? Many thanks!
Remarkable! Its truly remarkable paragraph, I have got much
clear idea on thee topic of from this piece of writing.
Useful information. Lucky me I discovered your website
unintentionally, and I am stunned why this coincidence ddid not
came about earlier! I bookmarked it.
Sales 79% in our jordan outlet online! Collect your beloved
jordans retro shoes complete series and types in cheap sale
price, bulk orders extra cupons and save more!
more from jordan for sale
Authentic Cheap UGG Boots UK in great colors are hot on sale in our store.
We ensure you will enjoy it very much. Welcome you guys!
more from : youth uggs sale uk
After the lengthy tanning process is complete, the final finishing is done so the skins may be used to make UGG boots.
[url=http://microbit.nl/goedkope-uggs.html]Uggs Kopen Goedkoop[/url]
I’ve been browsing online more than 3 hours today,
yet I never found any interesting article like yours. It is pretty worth enough for
me. Personally, if all website owners and bloggers made good content as you did, the internet will be much more useful than ever before.
Every weekend ? used to go to see this site, as i wish for enjoyment, for the reason t?at
this this website conations in fact good funny mater?al too.
A rebound relationship is one ??ere e?ther one oor both the partners a?? still nnot ?ver th??r previous
relationship. Women ?ill deduce ? comparison ?s bbeing m?de to
?erself and t?e woman you were staring at. Apart fr?m givcing tjem dating advice ( ???????) , parents ?lso ne?d to talk to the?r kids ab?ut th? many dangers t?at are
there online ?nd off.
You actually make it seem so easy with your presentation but I find
this topic to be actually something that I think I would never understand.
It seems too complex and very broad for me. I am looking forward for your next post, I will try to get the hang of it!
Greate post. Keep writing such kind of information on your site.
Im really impressed by it.
Hey there, You’ve done a great job. I will certainly digg it and for my part recommend to my friends.
I’m sure they will be benefited from this website.
Definitely imagine that which you stated.
Your favourite justification appeared to be at the internet the simplest factor to
keep in mind of. I say to you, I certainly get irked
whilst other folks think about concerns that they plainly don’t know about.
You controlled to hit the nail upon the top and also
defined out the entire thing with no need side-effects , other folks could take a
signal. Will probably be back to get more. Thank you
hollister bathing suits,On February 4, 2014, FamilySearch announced a series of agreements with AncestryMore volunteers are constantly needed, especially those with skills in languages other than EnglishOur hope is that we can continue to find ways to help the commercial companies to be successful so they will contin.This openness and acceptance of all kinds of people has made the Pure Land belief one of the major influences in Mahyna Buddhism.Although it’s really pretty, and it fits nicely, and I really (really) like it, I’m glad I waited and not rushed to pay the ridiculous eBay price for which the only size 8 was listed back when I started looking.
[url=http://www.weracemountainbikes.com/cycling/hollister-store/]hollister store[/url]
This article is in fact a pleasant one it helps new the web users,
who are wishing for blogging.
Hey I know this is offf topic but I was wondering if
you knew of any widgets I could add to mmy blog
that automatically twet my newest twitter updates.
I’ve been looing foor a plug-in like this for
quite some timke and was hoping maybe you would have some experience with something like this.
Please let me know iff you run into anything.
I truly enjoy reading your blog and I look forward
to your new updates.